Tag Archive: irish dance embroidery


If you are interested in any of these designs for your next Irish Dance dress, please contact me at taoknitter@gmail.com.

AD 43

AD 44

AD 45


AD 46

If you are interested in any of these designs for your next Irish Dance dress, please contact me at taoknitter@gmail.com.


(Changing the date of this post from its original 1/22/2009 to today so that it moves up in my list since folks have been asking for this info rather a lot lately!


Part 1: Prepping the fabric


Irish Dance dress embroidery…nowadays there is no clear cut definition of what this should look like.  It used to consist mainly of recognizably Celtic designs, but now anything can serve as inspiration for embellishing a solo dress.  The only consistent factor is its inconsistency!


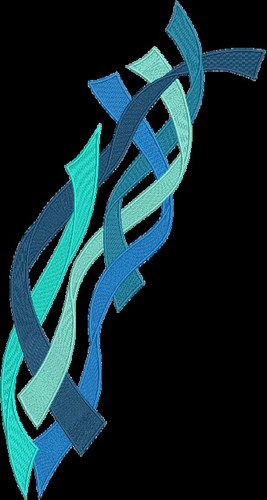
But the one thing we embroiderers want is to have a clear, smooth product.  One definite challenge in achieving this is the Celtic knot in all its forms.  The complicated series of overs and unders presents unique considerations because the stitch out does not happen in a smooth, unbroken fashion.  To accommodate the changing overlaps, a digitizer, and hence the embroidery machine, must move from place to place to establish the unders before going back to form the overs.  This disjointed stitching creates uneven pulling on the fabric which can create puckering and warping of the fabric which then contributes to joins that do not match.  Below is an example.


double knot braid broken


Very often a factor in this issue is fabric that is not hooped tightly enough so that the fabric cannot be moved.  Are some hoops better than others?  Most likely…I know that the hoops I use for my commercial machine are better than the hoops for my home embroidery machine at holding the fabric.  But because I was tired of seeing my Celtic knot designs out of alignment, I found a way around this.  (This is also a way to deal with fabric that cannot be hooped without damaging it like velvet.)


First, the fabric must be interfaced and then stabilized with fusibles.  For those of you thinking this does not seem conducive to creating a comfortable costume for dancing, well, you are correct!  Most Irish Dance dressmakers do their best to make these dresses as comfortable as possible, but in some instances the amount of embroidery dictates a certain stiffness that the dancer is more than happy to deal with in the name of Irish Dance fashion.  And, because so many skirts  are actually very stiff or have stiff parts, this heavy stabilizing actually helps achieve the desired crisp look.


Most importantly, though, this interfacing and stabilizing helps the fabric stand up to what can be very dense stitching.  Whether or not your base fabric is stabilized with a fusible interfacing (tricot or woven) is totally up to you.  I personally feel that all fabric, including the heavy velvet, will support embroidery better if it is first interfaced with a fusible.  I do remove as much stabilizer as I can from the bodice and sleeves and soft skirts when the embroidery is done, but the interfacing remains to give the base fabric the body and support it needs both as clothing and as the base for the embroidery.


After the fabric is interfaced, I fuse Pellon Decorbond to the areas to be embroidered.  This is fairly stiff interfacing which helps support the stitches.  Yes, there is softer, cheaper stuff, but I have found it does not work as well as I want it to.  The excess Decorbond can be cut away, which is what I do, or it can be left to help achieve the level of stiffness desired.


Your fabric can be embroidered two different ways: uncut and cut to size.  When doing the embroidery for clients who will be making the dress themselves, I ask that they send me rectangles with the pattern piece traced on the  stabilizer so that I can make sure the design is sized correctly. For myself, however, I cut the pieces out to size before embroidering because I use my patterns in my digitizing software to ensure correct sizing and placement; some of the professional dressmakers that I have worked extensively with also send cut pieces to me since by now we have individual sizing systems in place.


 To illustrate, I am using the center front panel of  a three panel dress.  This has been cut out and the silver pleats already sewn and fused in place.  

Pics sept 30 023 by you.


Below is the wrong side, interfaced with a fusible tricot fusible.

Pics sept 30 026 by you.


This next pic shows the piece stabilized with Decorbond.  The center of the area to be embroidered is marked by the vertical line.

Pics sept 30 027 by you.


Next to be marked in this case is the lower edge of the design.  I mark this place for this design because I want all of the skirt designs to be 1 inch from the finished hem.

Pics sept 30 029 by you.


Part 2: The Sticky Stuff

I use a LOT of this stuff  when  I am using my Bernina –
Photobucket

For my bigger commercial hoops, I use the same type of material from a very large roll.

If you look online for tutorials involving sticky stabilizer, you are told to cut your length of the stabilizer and then put it, paper back and all, into the outside hoop.  You are then told to score an area and pull off the paper to expose an area that you can adhere your fabric to.

I dislike this method because ultimately the hoop loses tension on the stabilizer (the paper is slippery!), and the fabric being embroidered can, and usually does, start to pucker and shift, especially when doing the complicated overs and unders of a Celtic knot.

I will illustrate what I do using one of my large hoops for my commercial machine.Pics sept 30 009 by you.

As you can see above, having come off of a roll, the stabilizer is curled.  To get started, I lay the inner hoop ring right side up on the paper side of the sticky back to flatten the curl as shown below.

Pics sept 30 010 by you.

Then, I begin to pull the paper backing off the piece of sticky stabilizer.Pics sept 30 011 by you.

With the hoop still weighing the stabilizer down, I pull the paper off one end.Pics sept 30 012 by you.

Then I move the hoop end onto the exposed sticky stabilizer.Pics sept 30 013 by you.

I rub the stabilizer onto the bottom and a bit of the side of the hoop.  Then, holding the hoop, I pull the rest of the paper off so that the hoop “catches” the stabilizer.Pics sept 30 014 by you.

Attaching the stabilizer evenly around the hoop can take some patience.
This next pic shows the sticky back attached tightly…when I thwack it with my finger it sounds like a drum. Pics sept 30 015 by you.

Next, I cut a piece of tear away stabilizer…

Pics sept 30 016 by you.

…and then hoop the whole shebang.

Pics sept 30 020 by you.

Part 3: Getting that fabric placed correctly!

Now I am ready to place the fabric.  I am going to line up the reference lines drawn on the fabric with corresponding lines that I stitch out onto the sticky stabilizer.


These are the placement lines stitched out onto the sticky back.

Pics sept 30 033 by you.


To refresh, here are the reference lines on stabilized piece.

 Pics sept 30 027    Pics sept 30 029


I begin by folding back the fabric at the junction that the two lines cross, and then I attempt to line up that fold with the the corresponding place on the stabilizer.Pics sept 30 035 by you.


It does take a bit of jockeying back and forth from end to end to get it lined up on both the x & y axes.  The pic below shows I am on track here…Pics sept 30 039 by you.


…but not at the other end.Pics sept 30 037 by you.


So, I shift until I get this straight…Pics sept 30 038 by you.


…then check the other end again…Pics sept 30 039 by you.


…press it down to check the horizontal alignment…Pics sept 30 036 by you.


… and I am done!

Pics sept 30 040 by you.


Before I begin embroidering the actual design, there will be a basting box sewn around the embroidery area.  This anchors the fabric securely in place to further reduce any shifting or puckering.  You can read a bit more about that here:  Basting Boxes .  Also, to help alleviate the sticky build up and reduce thread breaks,  I hoop a length of waxed paper under the sticky back…you can read about that here: Waxed Paper


Another new dress, this one made by Mary Jo Farr of Trefoil Designs.  

I did the embroidery, fooling with the design to get what MJ wanted.  This is one of my designs, a diagonal (obviously), based  on TA-AD 1.  I will get it up in the store soon, but as usual, if you want it sooner rather than later, email me.

I love doing these dress, MJ!!  This is one of the prettiest we have done yet!

Also have the first ribbon bodice digitized.  This can be either a stitch fill or an applique.  I will get it in the store, but it is available sooner if you want it.

There are currently 2 design sets from Susan available on Taoknitter Arts: Irish Dance Dress Designs & Embroidery.  Click anywhere below to get to a page of dress ideas.  Please keep in mind that I am still available to help you create your dream dress in any way I can!  More designs are on the way!

TA-SG 2

TA-SG 2 dress aaa TA-SG 2 dress a

TA-SG 1

TA-SG dress 1aaTA-SG dress 1bb

There are currently 2 design sets from Ann Donahue available on Taoknitter Arts: Irish Dance Dress Designs & Embroidery.  Click anywhere below to get to a page of dress ideas.  Please keep in mind that I am still available to help you create your dream dress in any way I can!  More designs are on the way!

TA-AD 2

TA-AD dress 2cc

TA-AD 1

TA-AD 1 dress aTA-AD 1 dress b

Dressmaker & Embroiderer: Terri Epperson, Majestic Dress: Custom Irish Dance Dresses
Embroidery Designer & Digitizer: Me


Just wonderful, Terri!!

Here is the reproduction of a hand embroidered dress that I was privileged to work on with Colleen Murphy and Kristine Baker.  Colleen makes the most wonderful American Girl Irish dance dresses, and she asked me to digitize the embroidery from photos of the original, human-sized dress.  Kristine Baker crocheted the collar, which Colleen says is a beautiful, perfect replica of the original.

dress front by you.

dress back by you.

Full look at front by colmurph2000.

Full Round by colmurph2000.

Side view of Embroidery by colmurph2000.

Favorite Photo!!! by colmurph2000.

13 by you.   12 by you.

11 by you.

16 by you.

17 by you.

And here is the owner of the original dress IN the dress (I am SOOO impressed) with the doll dress.  I cannot stop looking at this pic!!

Original dress with doll dress by you.

I have been researching the Book of Kells lately, and having now seen the sources of the images on the dress, I am in awe of the work the original embroiderer did.  Spectacular!

Thank you so very much for letting me be a part of this, Colleen!!!

You can read more about the adventure here: Newest Endeavor and Reproduction Dress Test as well as on Colleen’s site, Murphy Dresses.

A client sent me fabric to embroider.  Velvet.  I have not met a velvet I cannot embroider…until now.  I have worked with a huge array of different stretch velvets, microfiber velvets, cotton velvets, very plush velvets, silk velvets (my least favorite for embroidering, let alone sewing no matter how beautiful it is), and the longest haired velvet I have EVER encountered!  But this was the most difficult, so there was much snarfing here the past few days as I tried to figure this out.

They interfaced, stabilized, and marked the fabric perfectly!  Perfectly.  Sent me a perfectly finished piece for the testing I always do before I set upon the actual dress pieces.

The first test sucked.  Look at this puckering!  Erg!!

erg by you.

The second test was still bad even though I steamed the hell out of it at the risk of leaving marks and even tried to pull it apart which did not happen without some effort:

DSCN0784 by you.

So frustrating,  I try to keep costs down, but this was looking like I was going to have to purchase a variety of stuff to try to solve this problem.

I went back and forth about asking my fellow dressmakers for help because I was sure I was just going to have to bite the bullet and re-do the whole thing, but I posted my dilemma to my Taoknitter forum just in case.  Well, Katherine reminded me I might need to change the needle (which I did) and suggested I might want to try an adhesive spray even though I avoid the stuff like the plague because it sets off exploding migraines.  I was ready to buy the stuff.  Then maid2feis chimed in (she never posts her real name, so I won’t post it here either) to suggest that I use a fusible webbing to get the interfacing to stick…………………there is a reason I love those women on the forum!!!  It worked!!!!

DSCN0785 by you.

Thank goodness!  And thank you maid2feis!!!!!!!!!!

Now, I am still not sure why this velvet was so difficult.  It did not look or feel any differently than any other stretch velvet I have encountered.  The fusible cotton interfacing looked the same.  But none of it adhered the way I am used to.  After really fusing, steaming the test piece, all of the glue was gone from the interfacing, but it did not stay stuck to the velvet.  The velvet really did not seem to be any different than any I have used, but it was like teflon in terms of the adherence of the interfacing…it must be the velvet, yes?  Are they including teflon in the mix these days as a stain resistor?  Is there a new polyester out there that resists fusing?

Well, Mistyfuse came to the rescue.  Interestingly, I could still pull the velvet off the now Mistyfused interfacing, but it was much more difficult, and it stood up to the embroidery.  Weird

Isn’t it time for velvet to bow out of Irish dance dresses?  I’m ready.

(There is some good background info here: Pursuing the Perfect Embroidery Stitch-out.)

If you look online for tutorials involving sticky stabilizer, you are told to cut your length of the stabilizer and then put it, paper back and all, into the outside hoop.  You are then told to score an area and pull off the paper to expose an area that you can adhere your fabric to.

I dislike this method because ultimately the hoop loses tension on the stabilizer (the paper is slippery!), and the fabric being embroidered can, and usually does, start to pucker and shift, especially when doing the complicated overs and unders of a Celtic knot. I hate puckering and will do all I can to avoid it. I have yet to have a perfect embroidery sample, but I am working on it.

I will illustrate what I do using one of my large hoops for my commercial machine, but the same idea can be used on home embroidery machines.

As you can see above, having come off of a roll, the stabilizer is curled.  To get started, I lay the inner hoop ring right side up on the paper side of the sticky back to flatten the curl as shown below.

Then, I begin to pull the paper backing off the piece of sticky stabilizer.

With the hoop still weighing the stabilizer down, I pull the paper off one end.

Then I move the hoop end onto the exposed sticky stabilizer.

I rub the stabilizer onto the bottom and a bit of the side of the hoop.  Then, holding the hoop, I pull the rest of the paper off so that the hoop “catches” the stabilizer.

Attaching the stabilizer evenly around the hoop can take some patience.

This next pic shows the sticky back attached tightly…when I thwack it with my finger it sounds like a drum.

Next, I cut a piece of tear away stabilizer…

…and then hoop the whole shebang.

(Since I now mainly use a rectangular border frame which means there is nothing to hold the tearaway in place, I just wait until I am ready to stitch to slide the tearaway under the hoop.  The basting box or placement lines or even just the first stitches of a design catch the tearaway and hold it in place.  And since the sticky back does cause a buildup on the needle that causes more thread breaks, I have taken to adding a piece of waxed paper  from the baking section in between the sticky back and the tear away.  This keeps the needle lubricated so that I have very little build up and very few breaks.)

You will notice when stitching out designs using the sticky back stabilizer that I have added a basting box around the design.  In the pic below, you can see the faint line of the basting box.

Next, your applique fabric must be interfaced and then stabilized with fusibles.  This interfacing and stabilizing helps the fabric stand up to what can be very dense stitching.  Whether or not your base fabric is stabilized with a fusible interfacing (tricot or woven) is totally up to you. After the fabric is interfaced, I fuse Pellon Decorbond to the areas to be embroidered.  This is fairly stiff interfacing which helps support the stitches.  Yes, there is softer, cheaper stuff, but I have found it does not work as well as I want it to.  I sometimes use two layers of this when making patches depending on the the base applique fabric I have chosen.

I will explain making this file into an applique patch:

Once you have hooped the sticky back and the tear-away, unless you are just covering the hoop area with fabric to start, placement stitches will run on the sticky back to indicate where to lay the fabric:

Now, lay your interfaced and stabilized fabric in the hoop.  The following basting box and tackdown stitches will run (I run 2 tackdowns to help alleviate any fraying of the fabric which happens often with the types of fabrics we use in Irish dance.):

Then the following knots will stitch out:

After the knots finish,  I stop and remove the hoop for trimming. (I program a stop on a commercial machine.)

Remove the hoop from your machine.  Cut very closely to the outside stitching as shown below (obviously using different examples!):

Photobucket

Then, put the hoop back on your machine and finish the outside satin stitching:
At this point, the patches may start to separate from the sticky back which is why you do not want to have pulled the sticky too tightly when attaching it to your hoop.  If it is too stretched, the patch will definitely pull away and shift and the final satin stitching will be faulty.

Using other patches as an example, I will show you how I finish them.  Here, the patch stitching is done. You can see the perforations around the patches but no huge holes…the patches are still in the right place!
Photobucket

Before removing the patches, I run a line of Fraychek on the back edge of the of the outside satin stitching. Then, I punch them out.
PhotobucketPhotobucket

As you can see, there is a fine fuzz surrounding the patches. This is from both the sticky and tear away stabilizers. This needs to be trimmed away using either use my appliqué scissors or my fine, curved embroidery scissors.
Photobucket

Here they are trimmed. I can get closer with the smaller scissors…obviously the trick here is to trim closely without cutting threads which the Fraycheck actually helps with as it has sealed the edges which protects those threads. Since the edge embroidery thread is white, this is where I stop. When the outside satin stitch is a colored thread, I use either a permanent Sharpie or a fabric dye pen in the right color prior to applying the Fraycheck, and I color in the outside edge so all the white is gone, then trim when it is dry.

PhotobucketPhotobucket

I sometimes then iron a fusible web to the back of the applique to hold the patch securely in place when I the sew around the edge.  My preferred way of sewing around the patch is to use a clear monofilament, and using the outside satin stitching as a guide, I use a wide zig-zag to attach the patch flush to the fabric.

There is a new thread on Celtic Flame about stealing designs.  A dressmaking mom writes that another mom in her school told her she was wasting her time coming up with her own designs because there was so much to COPY on the internet.  When she first wrote, she alluded to a website that sells embroidery, so I wondered if she might be talking about Taoknitter Arts.

An answer that she just posted to another reply makes me think she is talking about my website.

Big sigh. 

Susan and I have hashed out the pitfalls of posting clear pics of the designs since I started.  She has dealt with this issue far longer than I have, and I respect her viewpoint, her advice and her experience.  I will not bore you, or myself, by re-visiting  the mental gymnastics (complete with teeth gnashing) that helped me arrive at the current presentation of the designs on my website.  If you look at it, I think you get it.

But, I do want to say that I know I take the risk of people copying things.  I have this tendency to believe that all folks are inherently honest and honorable.  I do, routinely, get blind-sided by self-serving idiots with an overdeveloped sense of entitlement, and I sometimes finally get really irked by stupidity and mean-spiritedness, but I have yet to see a change in my basic trust.  I now know what it sounds like when Susan shakes her head at me over the phone.

It would make me crazy to try to police things or try to find a more complicated way of managing the designs.  But let me be clear, copying a design is stealing and I am not shy about approaching the thief and making it public if I have to.  I did, by accident, see an exact copy of a dress I made for my daughter.  Susan designed it for us.  The design was never made available, but there it was, perfectly copied on someone else’s dress.  When I contacted the overseas dressmaker, she was great about it, very sorry, and told me that the design had been given to her by the dancer. 

I get contacted rather often by dancers who send me pics of designs from other dresses, even BN dresses, wanting THAT design digitized.  Sometimes I get a design “created by the dancer” only to be led by the dressmaking gods to pics of the EXACT design on a finished dress…that blows my mind.  Once I explain that I will not copy because it is both unethical and illegal, they usually calmly explain that they did not know that and we go forward.  Only once did I not hear back after my refusal…I think that was embarrassment.

I do think most folks either do not know or really do not think about it.  One poster on CF wrote: ” I think the problem is that most people don’t equate “appropriating” someone’s design as stealing because they don’t physically take something.  It isn’t like shoplifting where you actually take something in your hand.

It’s more like cheating on a test.

Ask your friend if she encourages her dd to copy her neighbor’s answers on exams in school. Why not? It is just what she did. She used someone else’s work and passed it off as her own.

Ask her if she’s going to brag about how she aquired her designs – Wow look what I copied off of the internet and I didn’t have to pay for it! If someone asks her where the design came from, is she going to say “Oh I digitized it myself” or something equally evasive. If she’s so proud of her cleverness, why not tell all?

Ask her if she thinks the TC will be happy if she finds out the design was lifted. Is she OK with her school being known as the one where it is OK to rip off other people’s dresses?”

Interesting viewpoint.

Susan made me laugh when she pointed out that truly, the only thing I should worry about is if someone else’s poorly digitized “copy” was thought to be mine!  Now that would be a drag!

There was also a point made by someone about using designs from a site on the internet.  She wrote: “While there are a couple of sites out there that have drawn up several dress designs specifically for irish dancing use, you have to remember then, that your dress won’t be an original. Chances of running into another dancer with the same pattern are slim but just something to keep in mind.

That mind set has never occurred to me!!  Yes, yes, I know that the conversation about whether or not a BN dress is really custom when they re-use designs in part or in whole pops up routinely.  But, it has always been my assumption that each dressmaker brings a totally different perspective to making a dress and so it will be rare that 2 dressmakers will use the same design the same way let alone the same fabrics.  In fact, what I love about my clients is that they always do something I did not envision.  Very often, they ask me to modify the designs by taking something out, putting something else in, taking it apart or trying something new with a piece of something else!  I love it.

Still, I guess that is a concern for some people.  I appreciate that.  And I also thoroughly appreciate my creative dressmaking clients.  Thank you for spurring me on!

I thought that the above might have been a rant…I guess it was just a bit of mental popcorn…

There are a couple of links in this brief post about Copyright Law: Substantial Similarity.