I routinely field questions from dressmakers with home embroidery machines about whether or not they can do large bodice designs that require one or more re-hoopings. The answer is always, “Of course you can!!”
I have yet to find a design I can’t re-hoop, but I am honest with dressmakers about the complexity of re-hooping some designs. In most cases, the dressmakers are game, so along with the split files I send detailed instructions written for their files complete with pictures. Sometimes, when the design is big enough to need 4 re-hoopings or the design requires extreme precision to line up contiguous lines, then the dressmaker may send the fabric to me so I can do it in a big hoop on my commercial machine, but there have been brave, adventurous souls who still want to do it themselves…my kind of dressmakers!!
Do you need big hoops? I have always assumed so since I have always had the mega-hoop for my Bernina and learned to use the Hoop-it-alls to expand my range, but I have had dressmakers use only their 4 x 4 inch hoops…that blew my mind, but they were determined! And I do understand that determination…never occurred to me NOT do something because it did not fit into my hoop. These were all done using my Bernina 200E:


Yes, each entire panel, edges and all, were done in the hoop with 1 re-hooping.

And my favorite of all time, my first, the one that was made all the more blissful by my ignorance!!!


I re-hooped all of these parts in the most convoluted, complicated way possible! In fact, I had started on this (I learn by jumping in with both feet…or headfirst) before I went to take some lessons for my Bernina machine and software. I was having trouble with the logic of the sleeve design, so I brought the file (as well as the front skirt panel) with me so the teacher could look at it. She took one look at the size of the file and told me it could not be done…every time I tried to get her to focus on my question, she simply said what I wanted to do could NOT be done on my machine. I finally whipped out the finished front panel (5 re-hoopings) to show her I could do it, I just had a question!!! She had no answer. Instead she asked me how I managed that front panel, but at that point my process was so twisted that I really could not articulate clearly. It was a big sigh day.
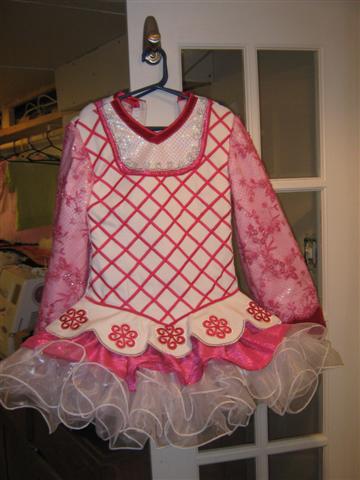
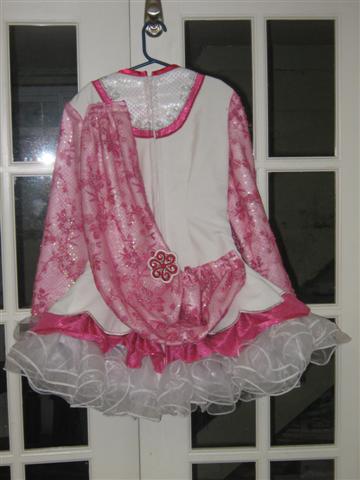
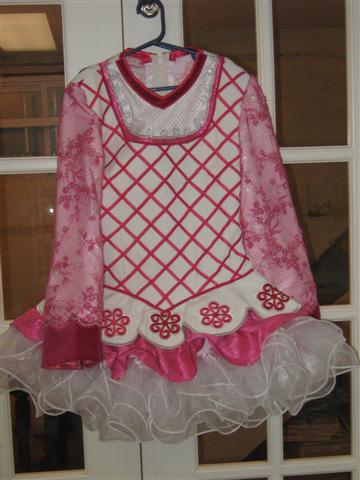
My friend Kris is working on this dress:
Dressmaker & Embroiderer: Kristine Baker
Designer & Digitizer: Me (AD 6)

The beginning of the directions that I send begin with a little pictorial about using sticky back stabilizer…
(The following information is for the home sewer using a home machine.)
There are online tutorials that show how to use the water-soluble stuff called Badgemaster. I love the stuff for patches that can be washed. Patches for Irish dance dress very often are made with fabrics that cannot be washed, so this is another approach. The result is the same.
I use a LOT of this stuff –

If you look online for tutorials involving this sticky stabilizer, you are told to cut your length of the stabilizer and then put it, paper back and all, into the outside hoop as below.

Then you are told to score an area…

…and pull off the paper.

I dislike this because ultimately the hoop loses tension on the stabilizer (that paper is slippery!), and the fabric being embroidered can, and usually does, start to pucker and shift, especially when doing the complicated overs and unders of a celtic knot. I hate puckering and will do all I can to avoid it. I have yet to have a perfect embroidery sample, but I am working on it.
I pull the paper backing off the entire piece of sticky back stabilizer…

…and attach it to my inner hoop.

This next pic shows the sticky back attached tightly…when I thwack it with my finger it sounds like a drum. (Please excuse my “dirty” hoop…that is fabric dust, thread, sequins, etc, embedded in spray adhesive from my attempts to use the stuff years ago. It never goes away, but it is not bothering me or my fabrics!)

Then I cut a piece of tear away stabilizer…

…and then hoop the whole shebang.

(There is more info here: Pursuing the Perfect Embroidery Stitch-out! )
(Note: There is one thing that I do for myself when stitching out designs using the sticky back stabilizer – I add a basting box around the design. In the pic below, you can see the faint line of the basting box.

Once the placement stitches are sewn onto the hooped stabilizers and the fabric is then lined up on the sticky stabilizer, the next thing to get stitched out is a long basting stitch around the design area. This ensures that the fabric will not move or pull or come away from the sticky stabilizer. I have also found that it helps eliminate any puckering. Some machines will add a basting outline with a push of a button. For others, this can be added to the embroidery files.
However, some velvet will very often be permanently marked by these stitches. Test a scrap by sewing and removing some basting stitches onto a scrap.I have found that crushed velvet can take it, but the shorter pile of regular velvet cannot always.
If your velvet cannot take a basting stitch, it is best to find ways to keep the fabric from shifting as it still can once the stitching starts even on the sticky back. I have a little stash of pins that I bent into curves to secure my fabric to the sticky back when I can’t use the basting stitches.)
I highly recommend you do a test stitch-out first.
Now, let’s understand your digitized files.
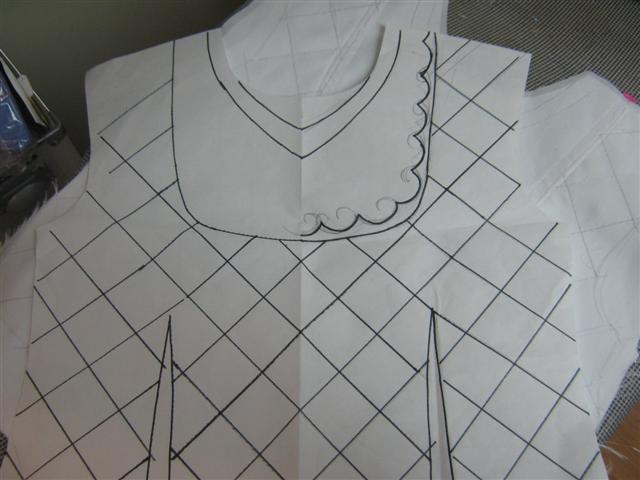
Bodice: This bodice design has been split into 4 sections. The black lines are the basting stitch reference lines in the stitch files.

Here are the 4 separate files:
bodice 1 center bottom
right shoulder left shoulder
You will start with “bodice 1.” Below are the pics of the file and the placement lines in the file.
 (This is not a separate file.)
Now, if this were me, I would have my fabric prepped and marked (not cut out to size yet) as I explain here: Pursuing the Perfect Embroidery Stitch-out!
I would have the center line of the bodice marked as well as the line I wanted the top of the middle of the desing to begin at. The lines on the bodice would look like this:
 This will correspond to the same lines in the file.
Now, once the hoop is ready, the placement lines in the first color (black in the file, but this could just be the first embroidery color you will be using) get stitched out onto the sticky stabilizer NOT on the fabric. You can stitch them onto your fabric if the fabric will not retain the needle marks, but as long as the interfacing is not removed, the lines will stay on the back for placing for the next file (the center line itself will be mostly covered by the stitching anyway). (For your test run, I would stitch all placement lines on the fabric.)
So, once the placement lines are stitched, place your fabric in the hoop, lining up your drawn line with the placement line as shown in Pursuing the Perfect Embroidery Stitch-out!
Stitch out “bodice 1.”
Remove from the hoop and remove excess stabilizer. Be careful not to remove or pull on the first set of placement lines.
Re-hoop the sticky back and the tear away for the next part.
You will continue with “bodice left side.” Below is the pic of the file.
 (This is not a separate file.)
Stitch out the black placement lines.
Line up the placement lines from Part #1 on the fabric piece with the new black lines. Use the points where the lines cross as your center points for each placement. Finish stitching part 2.
Remove from the hoop and remove excess stabilizer. Be careful not to remove or pull on the first set of placement lines. Re-hoop the sticky back and the tear away for the next part.
Part #3: You will continue with “bodice right side.” Below is the pic of the file.
 (This is not a separate file.)
Stitch out the black placement lines.
Line up the placement lines from Part #2 on the fabric piece with the new black lines. Use the points where the lines cross as your center points for each placement.
Finish stitching part 3.
Part #3 is finished. Remove from the hoop and remove excess stabilizer. Be careful not to remove or pull on the first set of placement lines.
Part #4: You will continue with “bodice bottom.” Below is the pic of the file.

Stitch out the black placement lines.
Line up the placement lines from Part #3 on the fabric piece with the new black lines. Use the points where the lines cross as your center points for each placement.
Finish stitching part 4.
Part #4 is finished.
Remove from the hoop and remove excess stabilizer. Remove placement line threads.
Et, voila!
As I stated above, I highly recommend doing a test stitch out. Perhaps there are superwomen dressmakers who can do this right the first time, but weirdness happens!
Many thanks to the dressmakers who send me pics of their re-hooped confections!
Dressmaker & Embroiderer: Molly Lafayette
Designer & Digitizer: Me

Dressmaker & Embroiderer: Judy Poole
Designer, Digitizer: Me

Dressmaker & Embroiderer: Judy Poole
Designer, Digitizer: Me

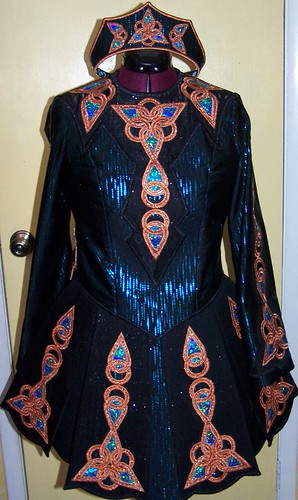
Dressmaker & Embroiderer: Lisa Horn
Designer, Digitizer: Me (Revised AD 6: Curls)

Dressmaker & Embroiderer: Mary Reilly
Designer, Digitizer: Me

You can see these dresses and more in the Taoknitter Arts Customer Creations gallery.


![[Irish+construction+001+(Small).jpg]](https://taoknitterarts.com/wp-content/uploads/2009/11/irish2bconstruction2b0012bsmall.jpg?w=300)
![[Irish+construction+005+(Small).jpg]](https://taoknitterarts.com/wp-content/uploads/2009/11/irish2bconstruction2b0052bsmall.jpg?w=300)
![[Irish+construction+006+(Small).jpg]](https://taoknitterarts.com/wp-content/uploads/2009/11/irish2bconstruction2b0062bsmall.jpg?w=300)
![[Irish+construction+010+(Small).jpg]](https://taoknitterarts.com/wp-content/uploads/2009/11/irish2bconstruction2b0102bsmall.jpg?w=300)
![[Irish+construction+011+(Small).jpg]](https://taoknitterarts.com/wp-content/uploads/2009/11/irish2bconstruction2b0112bsmall.jpg?w=300)
![[Irish+construction+008+(Small).jpg]](https://taoknitterarts.com/wp-content/uploads/2009/11/irish2bconstruction2b0082bsmall.jpg?w=300)
![[Irish+construction+007+(Small).jpg]](https://taoknitterarts.com/wp-content/uploads/2009/11/irish2bconstruction2b0072bsmall.jpg?w=300)
![[Irish+construction+013+(Small).jpg]](https://taoknitterarts.com/wp-content/uploads/2009/11/irish2bconstruction2b0132bsmall.jpg?w=300)